 Summer breeze, makes me feel fine.
Blowin’ through the jasmine in my mind.
So sang Seals and Crofts. But for the RVer in a hot climate, the only summer breeze that’ll make them feel fine is the one blowin’ chill through the vents from their air conditioner. Yes, the hot days are already on some of us, and soon we may all need that brisk flow while traveling.
Is your air conditioner up to the task of keeping you cool? A little springtime maintenance can make the long, hot summer a great deal more bearable.
Let’s start with the easy part: the air filters. A quick look-see at your owner’s manual will show you how to get the inside air filters out of the unit. Typically you’ll just need to pull a few screws and drop a plastic (or metal) grill down to access the filter. Many can be cleaned up with a simple bath of dish soap and water, dried thoroughly, and put back in place. Others may be the type that needs to be replaced.
In either event, when air conditioners are called on to work, the filters should be checked at least once a season. If your travels take you to dusty areas, checking those filters (and cleaning if needed) should be handled every couple of weeks.
Replacement Option
If you need to replace a filter, consider upgrading to after-market electrostatic filters. These cost a little more, but if what all the bragging on the box says is true, they’ll grab hold and hang onto much more dust and pollen than those original equipment variety. We’ve never done any testing to see if it’s true or not, but there’s your food for thought on the matter.
While you’ve got the ladder out to pull the filters down, you should take a look at any A.C. ductwork. Some rigs have metal channels to direct cold airflow; others may use distribution boxes. In any event, take a peek and see if there’s any dastardly dust lurking therein, and remove it to save your sniffer.
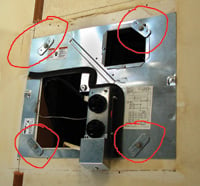
If you’re feeling a bit more adventurous, check out unit security. We’re not talking about somebody stealing you’re A.C. unit, but rather having the thing get loose and fall off your rig. An A.C. unit is bolted onto your rig rooftop, and generally speaking, the mounting bolts come down through the roof and snug up inside the rig. Often these can be accessed by removing the inside trim that surrounds the unit. Be sure to disconnect the power before pulling this trim—you may expose electrical fittings you don’t want to get your fingers into. Once you spot the mounting hardware, make sure it’s tight. Incidentally, water leaking into your RV through the A.C. unit can sometimes be traced to loose mounting bolts.
Looking on Top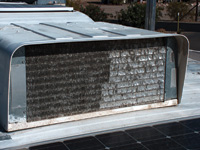 Now it’s time to head outside with a sturdy ladder. Bear in mind our usual rooftop work tips: Don’t walk on the roof. Especially is this so if your RV doesn’t have a solid plywood deck under the roofing material. Best to put a “kneeler board” across the rafters and knee-walk across it to reach the A.C. unit.
At the unit, check out the condition of the condenser fins. These little aluminum fins are thin metal plates that provide a broad surface exposed to outside air. The idea is hot air, pumped out of your rig, is drawn away to the outside world. If these fins are bent over, not allowing a free-flow of air from inside the box, they’ll need to be straightened out. A thin knife or screwdriver blade may help. Or you can use an air conditioner fin comb—a specialty tool that can help if the fins are not too badly bent. We once spent countless hours with a knife blade straightening out a whole mess of fins that had been completely bent over.
While on the roof, inspect the A.C. unit “shroud,” the protective cover. These are prone to taking hits from branches; plastic shrouds seem to be susceptible to UV ray damage. Sometimes they can be fixed with fiberglass cloth and resin—check out a boat supply or auto parts house. If you repair cracks on the inside of the shroud, the work will likely be secure, but not obvious to outside observers. A more expensive solution is installing a replacement shroud.
The shroud should be securely mounted: You’ll find screws around the bottom of the shroud that tie it to the A.C. unit itself. Too much zeal with a screwdriver can easily crack the shroud around the mounting holes, rendering it useless. Take it easy! Firm, but not over-torqued is the rule for installing a shroud.
Take the screws out and carefully remove the shroud. Again, make sure you have the power disconnected—you don’t want the unit to start up while you’re poking around “under the hood.” You’ll be looking for the evaporator—it looks like a small automotive radiator. Take a brush and gently remove dust from it. If you have an air compressor, gently blast the dust out with pressurized air. Getting the dust out will make your system more efficient.
Adding Oil
Now check out the motor. Some A.C. units will have oil holes, possibly covered with a rubber plug. Other A.C. motors are permanently sealed and don’t require lubrication. For the former, carefully remove the plug and add three or four drops of oil—some recommend “three in one” oil for the job. Over-oiling is worse than not oiling! Replace the rubber plug(s).
Put the shroud back on, while keeping the torque down to a dull roar.
Now it’s system test time. Be sure you have sufficient power. Most A.C. units require your RV be hooked up to at least 30-amp service. If you don’t have the power, wait until you get somewhere where a 30-amp circuit is available. Turn on the unit and let her rip. You should have plenty of cold air delivery. Enjoy a cool summer!
Russ and Tiña De Maris are authors of RV Boondocking Basics—A Guide to Living Without Hookups, which covers a full range of dry camping topics. Visit icanrv.com for more information.

Leave a Reply