The ground never looks crooked until you try to sleep on it. If you don’t know how to level your fifth wheel properly, you’re in for many sleepless nights—or worse.
Repeatedly parking on uneven ground can destroy your RV refrigerator, since this appliance needs a relatively level surface to safely operate. But don’t worry, as long as you have stabilizing jacks, blocks, and landing legs, you can enjoy a comfortable level camping experience. Here’s how we do it in four easy steps.
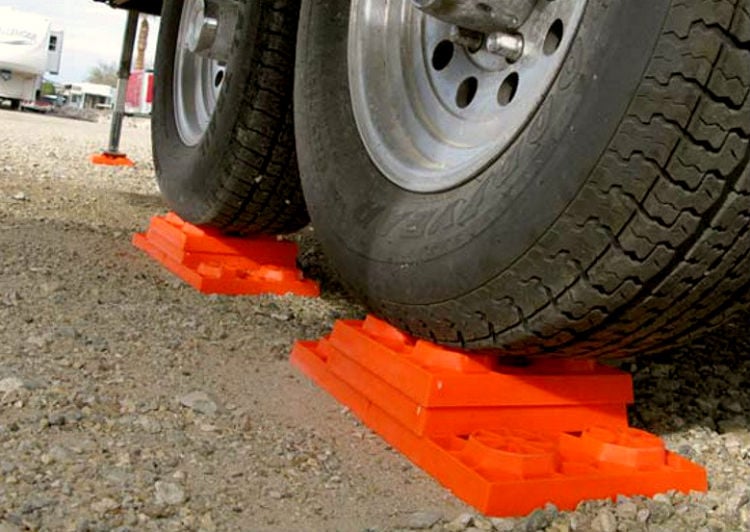
Level parking spots make for happy campers. Here’s how to do it. Image: LiveWorkDream.com
How to level your fifth wheel
Shorter fifth wheels don’t seem to have as much of an issue when it comes to uneven campsites. At least that’s from my experience. For example, we never used leveling blocks during the seven years we owned a 24′ fifth wheel.
Crooked campsites just didn’t bother us that much. But when we upgraded to a 27-foot rig, everything changed. Today, if a parking apron is slightly uneven, we certainly feel it in our longer and wider RV. Moving to a bigger rig forced us to step up our game in order to enjoy restful nights and a properly working RV refrigerator. It only takes a few extra minutes.
Step 1: Find a level campsite
Checking for levelness seems obvious, but it’s often one of the first things we forget about when we’re tired. Before detaching the fifth wheel we do our best to see if the spot is (or isn’t) level. The exterior bubble levels on the RV are a first point of reference but we also step inside and place a carpenter’s level on the kitchen table.
Sometimes we’ll even remember to use the leveling app that came with our smartphone. If we think the site will work with some fine-tuning, we’ll proceed.

Smartphones often have built-in leveling apps. You may also like LevelMatePro
Step 2: Level from side-to-side while still hitched
Before detaching the rig from the tow vehicle, we’ll level the fifth wheel from side-to-side by maneuvering the entire rig around as much as possible.
Step 3: Raise the low side with leveling blocks
While still hitched up, we place RV leveling blocks underneath the tires on the downhill side of the trailer.
We simply use store-bought leveling blocks. They’re much easier than carrying around bulky homemade leveling blocks. They also allow us to raise our RV using measurable one-inch increments. Levelers are wide enough for most RV trailer tires.
Once the blocks are placed directly in front of the trailer tires, we’ll we slowly pull forward and onto them. Next, we’ll level from front to back.
Step 4: Use fifth wheel leveling jacks
Once our fifth wheel is parked on the blocks, we chock our wheels and unhitch. Our next move is to level from front to back, which we accomplish by raising or lowering our RV’s front leveling jack(s).
Once that’s done, we’ll extend the rear stabilizing jacks just enough to prevent rocking. But we don’t crank down too hard since our only goal in this last step is to take some weight off the trailer suspension in order to minimize interior bounce. When we’re camped on a soft surface like dirt, we’ll place blocks underneath the jacks for additional stabilization.
Once you learn how to level your fifth wheel it soon becomes second nature. As long as you can remember to stay hitched up before checking for evenness, you too can enjoy level campsites, restful nights, and a safely operating refrigerator wherever you go.
See also: An Easy Way To Level Your RV Without Blocks

I respectfully disagree with the author’s comments about “bulky” homemade leveling blocks. I made some from seasoned Western Red Cedar, in one inch thickness increments, with a sloped “ramp” at the front of each plank. They were long enough to span the footprint of the tandem axles, short enough to stow in the pick up truck bed. I gave up on store-bought plastic levelers after seeing so many mangled and deformed ones being used under trailers lighter than ours. My recommendation: talk to seasoned RVers using the plastic blocks, and those using something home-built. Decide for yourself, based on your needs, budget, and comfort level with bought/made solutions.
Generally speaking at least one angled block helps, as you most often have to back onto the blocks, but on pavement the blocks can scooch. However, since a got a bunch of the plastic ones I must say they are far more convenient.
I carry an old 4-foot level, lay it on the ground where the axles will be, raise the low end of the level, judge how high I need to go by doubling the distance at the end of the level, Set my chocks, then have the wife line them up as we go back. Pretty simple, usually gets you close enough for comfort, final adjustment with the landing gear.
If its just overnight, eyeball it, the long level on the ground or across the front really makes a difference, those little guys are cute and all but…….
Thanks for the helpful feedback Robert!
I totally agree with you. I have also made my own western red cedar planks, and to minimize splitting, added a layer of plywood on the bottom, using lots of roofing nails. The planks are easy to stow, and being in 1″ – 1.25″ thick increments works out well.
Left Coast Canuk
There are many good ways to level an RV side to side. The way I do it is using pieces of 2″x 4″ board all about 12″ long. These can be cut from scrap wood and stack compactly to store easily. If you need to raise your trailer with a double axle about 1 inch, you would simply lay three pieces side by side on the ground, in front or in back of one of the tires, perpendicular to the tire, and then move the trailer so the tire is centered on top of them. Of course, if you put three pieces next to both tires and moved the trailer on them, that would raise the trailer the thickness of the wood which is about 1 3/4 inches.. I was at one site that was about 8″ off level and I used the boards in this fashion to level the trailer. You can also use a few 1′ x 4″ boards 12″ long to fine tune the leveling. For me, this is procedure much easier and more versatile than building and storing bulky wood ramps for leveling.
These size boards are also great for supporting the trailer jacks. They can be stacked in crib or Lincoln log style to provide a very solid base on uneven or bumpy ground. Large solid blocks may actually rock back and forth on bumpy ground reducing stabilization.
I tend to remember my plastic blocks because I had to pay for them.
Leveling side to side and front to back should be the same with fifth wheels and travel trailers. It is really easy to do as discussed in this post. You can find a more detailed procedure on how to level and stabilize you trailer at: http://www.steadyfast.com/stabilizing.html
I have recently purchased a used 25ft 5th wheel. I am practicing leveling it in my drive before moving out. I have the unit level sideways. I am lowering the unit in the front to get it level front to back. I cant seem to get level. I have the front jacks down and lowering the unit but the unit does not seem to get level front to back. what am I doing wrong? next question, if I get to a camp site and need to have the unit level left to right, how do I get the wheel off the ground to place the leveling pads under the wheels.
I think the first step in arriving at a site is to use a four or eight foot spirit (“carpenter’s”) level to determine how much blocking will be required to get the trailer level side to side. By using a level of a known length, and the distance from the two sets of wheels (the “track”), you can figure out how much height needs to be added to get the site level. For example, if the 4′ level showed you need 1″ to get the first 4′ level, then chances are you will need 2″ to get the 8′ wide trailer level. Lay out the planks on the low side, and back onto the planks, then open the trailer door and using the level inside on the floor, verify the trailer is level side to side. If it’s way out of level, repeat with more or less planking/blocking, until the trailer is as level side to side as possible. Now disconnect the tow vehicle and level front to back.
Some people buy ‘stick on’ levels for RVs, and use them to initially check the site by just parking on it, and then determine how much leveling is required. My experience with this method is the difficulty in precisely calculating how much blocking is required. The 4′ or 8′ long level is a more visual method for me – once I lay the spirit level across the site where I plan to park, I can see how much extra height I need to get that spirit level bubble exactly in the middle.
There are lots of techniques and preferences out there, the key is find one that works for you, is safe, not too onerous, and doesn’t provide too much entertainment for the neighbors !
Enjoy that rig, and don’t sweat the small stuff (it’s all small stuff).
Left Coast Canuk
I totally agree with you. I have also made my own western red cedar planks, and to minimize splitting, added a layer of plywood on the bottom, using lots of roofing nails. The planks are easy to stow, and being in 1″ – 1.25″ thick increments works out well.
Left Coast Canuk