 The old song declared, “I’ve got three wheels on my wagon, but I’m still rollin’ along.”
For most of us, having only three wheels on our fifth-wheel or travel trailer “wagon” could be a disaster. Sometimes it happens: Neglected axle bearings can lead to getaway wheels, and the results aren’t pretty.
Wheel bearing neglect ranks right up there with failure to regularly inspect tire pressure. Both can have disastrous consequences, the kind that can make your RV trip memorable—but not glowing with what we used to call Kodak memories. Having a wheel bounce off down the road isn’t just an expensive embarrassment for the owner; runaway wheels can crash into other vehicles with fatal results. Even when bad bearings don’t cause wheel loss, they can easily cause a “lock up,” ruining the tire.
The consensus among RV service techs is that trailer wheel bearings should be inspected and repacked every year. It’s not rocket science, but it does require jacking up the trailer, removing parts, and getting a bit greasy. Figure a couple of hours of your labor will be required. Let’s walk through the job together.
Jacking Point
First, make sure you thoroughly block up the tires on the side of the trailer opposite the one you’re jacking—chock them so the trailer won’t roll either way. Next, you must select a safe jack point. Never use an axle as a jack point! This can quickly goof up your trailer alignment, and possibly affect handling, as well as tire wear. Check your owner’s manual for the proper jack point, and lacking that information, use the trailer frame.
Carefully block the trailer so if the jack slips, you won’t be caught in a bad way. We only remove one tire at a time to perform the service, so if anything slips, we have the insurance of that other tire holding things up.
Remove the Bearings
With everything secure, remove the wheel stud nuts and remove the tire/wheel assembly. At the end of the axle shaft, looking right at you will be a dust cap. You’ll need to carefully pry it off. A thin, slotted screwdriver works well. Tap the blade of the driver into the crack between the dust cap and the end of the axle. Gently tapping the sides of the dust cap with a hammer may help release the cap before the prying begins.
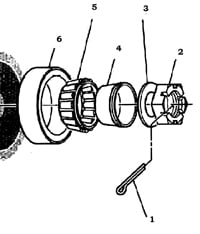
You’ll find a cotter pin (1) that locks a castellated nut (2) or nut-lock-and-nut combination on the end of the axle on the spindle. This holds the whole lash-up together. Use needle-nose pliers to straighten out the cotter pin, and pull it loose.
Now remove the castellated nut (2) and possibly yet another nut next to it, and a flat washer (3). Channel-locking pliers will facilitate spinning off the castellated nut.
Next, grasp the wheel drum and pull it off the spindle. It may hang up on the brakes, so tapping it with a hammer may help remove it. The outer bearing (5) and race (6) will come out with the drum. If you have excellent coordination you may be able to keep the bearing from falling out of the drum—but most likely it’ll fall out. If you put a clean cloth down on the ground under your work area, the bearing won’t land in the dirt. That’s best.
Take a close look at the grease around the bearing. Is it kind of white or gray—in any way discolored? This could indicate moisture crept into your system. Rust is a definite problem. Drop all the small parts in a container of gasoline to use as a solvent for clean up. We’ll come back to these.
Turn your attention back to the drum. The seal (4) will need to be pulled out. Lay the drum down with the seal facing you. Use a claw hammer to yank the seal out. Toss the old seal—you’ll need to replace it for safety’s sake. Next you’ll find another bearing—the inner bearing—still in the wheel. Pull it out and look it over as you did the outer bearing. Drop it in your solvent container.
All that’s left in the drum now is a lot of old grease and the races (6) that the bearings run in. Use paper towels or shop cloths to push the bulk of the old grease out. If you situate the drum over the top of an appropriately sized container, you can push this goo right into a trash bucket without messing up your work area.
Inspect the Bearings and Races
Now turn your attention back to the small parts in your solvent bucket. You can use a paintbrush to help you clean all the grease out of the bearings and off the other parts. Examine the bearings with a critical eye. Don’t go cheap here—a bad bearing can really cause you problems.
While not too likely with an RV bearing, still look for any sign of rust from moisture. More typically an issue will be a bearing that shows sign of overheating. Look for discoloration of the bearing, meaning anything bluish to grayish. Examine the bearings closely for any sign of pitting. If you see any pitting or discoloration, it’s best to get new bearings.
Clean up any other grease in the drum with solvent or brake cleaner. You should be able to clearly see the races in the hub. Like the bearings, if they show any sign of rust, discoloration, or pitting, they should be replaced. If you are replacing the wheel bearings, it’s simply a good idea to replace the races at the same time. To remove them, use a punch and hammer to tap them out of the drum.
Putting it Back Together
If needed, start with inserting the new races. Put the race in the drum, thin edge out. Tap the race gently with a hammer until it’s level with the hub of the drum. Once it’s level, use the old race to push the new race farther in. Be careful, you don’t want to get the old race stuck. Now grab a big socket that will fit over the race and allow you to use it as a tool to tap (with a hammer) the race into the hub. Tap around and around in a circular motion, pushing the race into the hub until it bottoms out. You may hear a different tone that indicates you’ve hit bottom. Repeat this for the other race. Lightly grease the races’ outer surfaces.
Now to the bearings themselves. It’s best to put on a pair of disposable gloves, but you can bare-hand it if you’re a tough guy. Put a glob of wheel bearing grease in your left palm (assuming you are right handed) and with the bearing in your right hand, wide side down, push the bearing down into the grease. This will force the grease into the bearing surface, and you’ll simply rotate the bearing around, packing more and more grease into it.
When the grease bubbles up through the groove at the top of the bearing, around the entire surface, you’ve packed enough grease in. Wipe plenty more around the roller surfaces of the sides of the bearing. Don’t worry; you can’t over-grease a bearing.
Next, set the drum on your bench with the “tire side” down. Lay the wheel bearing into the hub of the drum, narrow side down. Push it into the hub as far as it will go. Now place the new seal over the top of the bearing and then using a CLEAN block of wood, using the block as a buffer over the top of the seal, tap the seal into the hub with a hammer. Tap the seal in until it’s flush with the hub. Use a towel and wipe away any excess grease.
Using brake cleaner, shoot down and with a clean towel, wipe off any dirt and grease from the axle spindle. Now apply a light coating of bearing grease to the spindle, and you’re ready to put the drum back on the spindle.
Slide the drum back onto the spindle and push it back firmly. Now insert the outer wheel bearing (narrow side goes in first); push it in firmly. Reinstall the spindle washer, and spin on the castellated nut.
Determining the right snugness for the castellated nut is critical. Turn the castellated nut until it stops or is tight. Using both hands, rock the drum to ensure it is firmly pushed in all the way. Tighten the nut to take up any slack.
Now to make a final setting, back off the nut until loose. Now re-tighten it snugly until it stops. Eyeball the nut to see how the hole the cotter pin slides through lines up with one of the castellated nut notches and gently back off the nut one notch until these are aligned. Feed the cotter pin through the hole and notch. Rock the drum back and forth—it should barely move from front to back. You can pull the pin back out, and loosen the castellated nut one more notch to “feel” the difference.
In the end, with the tire reinstalled, there should be no more than a quarter-inch of play at the outside edges of the tire. When you feel you have the snugness set properly, bend over the end of the cotter pin, reinstall the dust cap, and reinstall the tire.
Inspecting and repacking wheel bearings is not a difficult task, but it is time consuming. Nevertheless, repacking your wheel bearings will probably take you a lot less time than you’d spend should a bearing fail and leave you sitting beside the road.
Russ and Tiña De Maris are authors of RV Boondocking Basics—A Guide to Living Without Hookups, which covers a full range of dry camping topics. Visit icanrv.com for more information.

NEVER AND I MEAN NEVER USE GASOLINE AS A SOLVENT TO CLEAN PARTS………..
That is one of the unsafest and stupidest things to do. There is no excuse to use gasoline as a solvent…..
Go to Walmart and buy some of their house brand brake cleaner and spray it on the the bearings in the same container you would have used for the GAS. You could also use diesel fuel as it has a much higher flash point the Gas.
Never use gas it could be you last time you use any solvent.
Why is it he unsafest and stupidest things to do?
Other than being HIGHLY flammable, it doesn’t dry ‘clean’, leaving a gritty residue that will cause the grease to not be as effective and break down faster. Gasoline is for internal combustion engines, cleaning solvents are for cleaning
Do not re-use an old cotter pin!
Cotter pins are the cheapest part of a bearing job-use a new one