Don’t worry, this isn’t your eyes playing tricks on you. This is a real RVer with serious RV delamination problems.
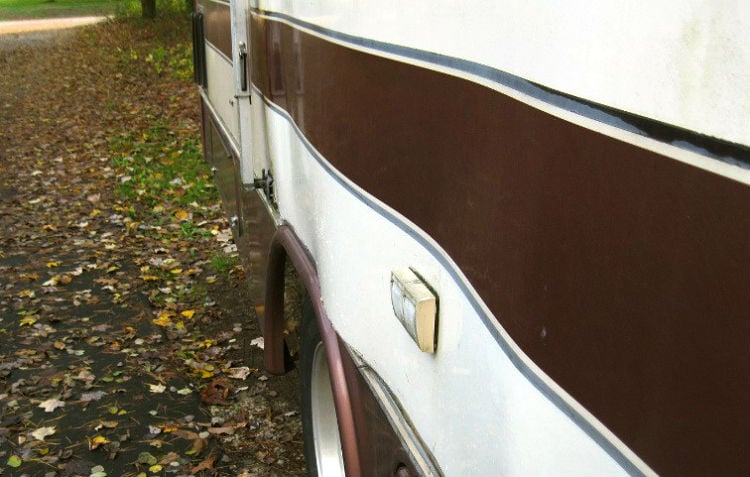
Photo courtesy of iRV2 Forums
What is RV delamination?
Aluminum siding used to be the de facto choice for RV manufacturers, but most have switched to fiberglass siding because of its durability, lightweight properties, and lower overall cost. RV walls are also easier to produce and install.
They’re built like a sandwich; the exterior fiberglass and interior decorative walls are the “bread,” and in-between contains the “meat,” which is two layers of wood and Styrofoam. These materials are vacuum bonded to each other, then the “bread” in order to serve as backing reinforcements.
Fiberglass is extremely flexible, durable, and unlike aluminum, can bounce back from common hazards like road debris and hail. Unfortunately, the “meat” underneath the fiberglass isn’t quite as durable. If something impacts the RV roof or wall it might not puncture the fiberglass, but it can hit it hard enough to permanently dent the underlying Styrofoam and wood substrates.
This RV delamination problem is obvious.
The result is a convex air pocket that causes bonding agent failure and separation. A bubble forms over the unglued pocket, which will grow in size over time as the fiberglass-walled RV flexes with normal use. The bubble will gradually crack and trap moisture inside, causing further damage.
Bonding agent separation can also happen when water seeps in through a roof, window, or vent seam with inadequate or deteriorated lap sealant. The separation creates a river of moisture and the result is a soggy RV “sandwich” eventually consisting of unsightly blisters, bulges, and waves on the outside and irreparable wood rot on the inside.
Most owners don’t recognize the signs of RV delamination until it’s too late. Fiberglass RV walls can look smooth on the outside while real damage is unseen. When the problem becomes obvious, repair is usually expensive and often impossible to fix.
Recognizing and repairing RV delamination
Whether you own a fiberglass RV now or you’re shopping for a used one, it’s important to know the signs of an RV with delamination. First, do a thorough walk-around in direct sunlight and closely inspect the side, front and rear RV walls as well as the areas around windows and roof vents.
The fiberglass should be flat and smooth. If you notice any waves, bubbles, or creases, press them with your finger. If the area feels spongy, you have probably spotted RV sidewall delamination. Double check by tapping it lightly with a plastic utility serving spoon or other implement.
A hollow sound indicates delamination. When the RV is parked in shade, notice how the waves and bubbles react. If they get smaller and flatter, that’s another indicator of RV sidewall delamination.
If you’re just browsing the market for a used fiberglass RV, now’s your chance to run. You do not want to own a RV with delaminated sidewalls, even if the owner is giving it away for free.
The repair costs rarely justify the effort and expense of repair (however there are exceptions, so keep reading). If water has permeated RV sidewalls, it may have already weakened the RV’s structural integrity. Mold spores can fester on the damp inner wood layer and cause health problems for the owner. You won’t know any of this is occurring without peeling away the outer layer.
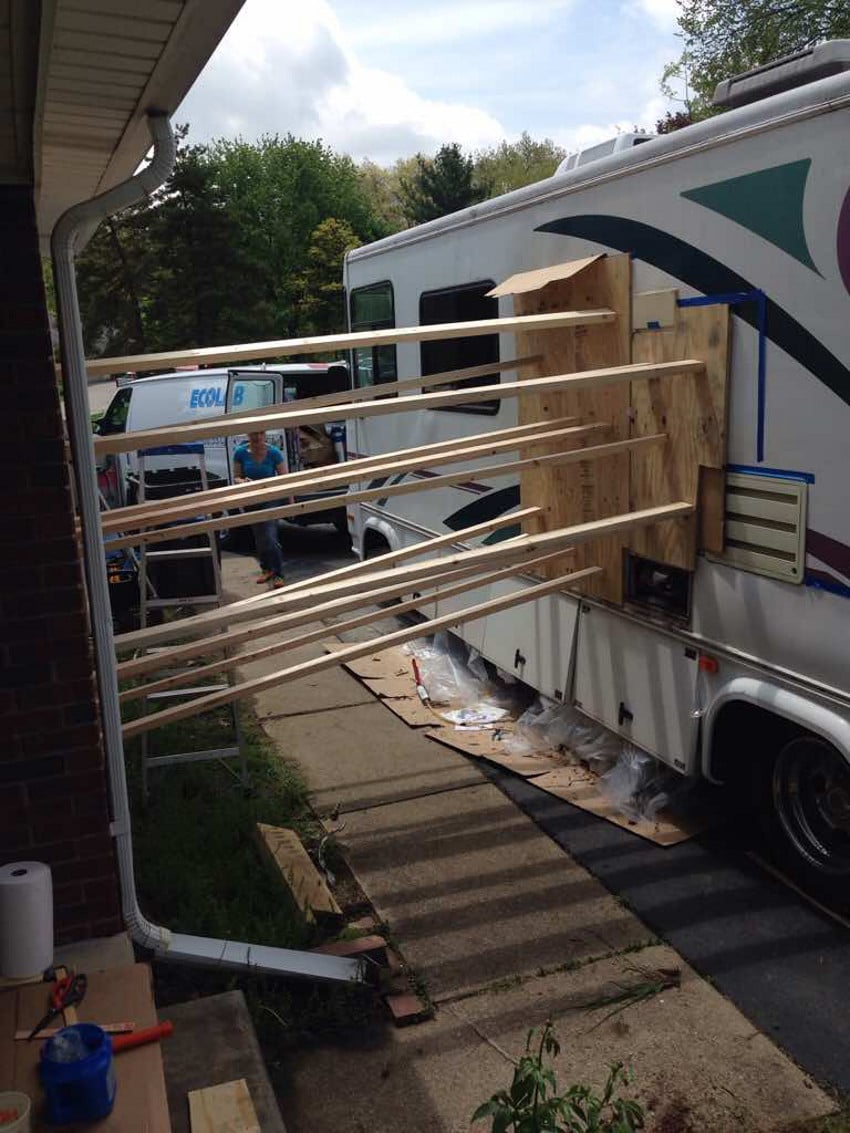
Pressing the substrates back together during the delamination repair.
My RV has delaminated. Now what?
The most common cause of the delamination problem is an owner failing to periodically re-seal seams with lap sealant. As a consequence, RV insurance companies and extended warranties don’t usually cover RV delamination repairs.
If you’re in this unfortunate situation but the damage is relatively minor, you can try a delamination repair kit. These kits cost $200 to $300 and include a heavy-duty, marine-grade bonding system that can be used to re-glue the fiberglass to the underlying layers. They come with syringes and tubing for injecting the sealant into tight spots. However this solution only works if the inner layer is free from water damage.
If the problem is big but you have a never-say-die attitude, a DIY approach to RV delamination repair is possible. Notice how this hearty iRV2 Forums member documented his entire repair job for anyone brave enough to try it themselves.
Have you experienced sidewall delamination on your rig? If so, what did you do about it? Let us know, because there are many fiberglass RV owners who would appreciate reading about your experience.

Hi tried to sign up for your newsletter,but went off my my device.would be interested in getting it,full of topics I could use as a rv-er.thank you ..Roy…
I have little dilam on my 2007 Dutcman Adirondack travel trailer.Found company in Cal,that offer aluminium (3 pices) or fiberglas.My rv is all fiberglas..Should I put al or fiberglass( 1 pice)
I have tried repairs and the problems keep adding up. I paid a contractor $1000 to re caulk and still find new Delaminated areas. The article said not to buy an RV with delamination, are the manufacturers in any way responsible ?
No. My 2009 Foretravel 45′ Phenix had practically the entire coach delaminated. Of course, the warranty had run out after two years and this happened in After several conversations with Foretravel management, they agreed to split the cost 50/50. That was agreeable to me except that their charges were retail. My thoughts were we would split the COST. However, I paid for half the profit to have it repaired. The total cost was around $24,000 with my part being $12,000.00. I guess I came out okay being as I had been involved with many issues regarding my coach.
I have a RV that have some delamination on one side..I need it fix. Who do I get in touch with in Cincinnati here thank you
Thank you for the very informative article. The linked article from a DIYer that actually did it is especially helpful. Now I know what I’d be getting into should this happen to me.
I’ve been through the delamination issue and the repair with the epoxy repair system. It worked pretty well but it was a major undertaking. I used a similar method of pressing the walls between my garage and the sidewall but I used cranking load bars to apply the pressure and added 2×4 bracing to hold sections in place while repositioning the bars.
I had also addressed significant water damage on a ‘tin & sticks’ 5th wheel that would have resulted in delamination if the walls had been bonded fiberglass.
After experiencing both I would choose a ‘tin & sticks’ trailer if we ever went back to a trailer vs a Motor Home. ‘Tin & sticks’ is so much more repairable.
Ours delaminated, and the factory is picking it up to replace the walls. No place to live for a month, but at least is will be repaired. Camper is less than 2 years old, but out of the one year warranty.
The delamination issue seems to be largely contained in the older, early days of the fiberglass lamination process where the skin was fiberglass but the ‘guts’ were still 2 x 2 wood studs and luan interior paneling. As with the good old fashioned aluminum skinned jobs, chasing leaks was and is a constant game. The sticks and staples wrapped in a soda can construction of our last camper went to crap despite constant leak chasing on the roof, wall seams, lights, pipe vents….basically ANYTHING that protruded thru the skin, or the rubber roof caused or allowed water leaks into the camper. Literally rotted to pieces, along with the usual black mold infestation as well. Next one will be “Azdel” fiberglass, vacuum bonded to aluminum on BOTH sides of the wall.
I’ve been down this road and it can be an avid DIY project – just be sure you understand how your walls are put together – and find the leaks before the repair! I parked a 1985 Eldorado Class A (Wood structure) next to the garage and braced the plywood to the sidewall of the motor home with 2×4’s. This motor home has a horizontal metal strip about half way down – so opening it up was relatively easy. All went well and yes – expect the Luan to be in tattered pieces – I removed all the loose stuff I could get to so as not to leave another high spot on the outside and to get a better substrate to mount to.
I sold the motor home with full disclosure to a friend and pictures of numerous projects, including a new instrument panel – hey owning one of these things is like a hobby! (He has been after me to buy my current one as he knows the impeccable maintenance regime).
I too was all enthused about a shiny motor home idea on our current Class A Winnebago and bought a gallon of Zep wax, after replacing decals etc, and did a lot video viewing on YouTube. The results a year or two later appear to be disastrous and very difficult to remove the stuff. I have an unopened gallon if anyone is interested! I don’t recommend doing it!
Early in my engineer ing career I was a manufacturing engineer for Safari Motor coaches. In 95′ I designed and built a wall lamination system using urethane glue and vacuum pressing which is as waterproof as it gets. Safari used aluminum studs and skins which were riveted so as to completely prevent any delamination. I feel that I have a lot of expertise on wall construction that avoids delamination but also own à Filon truck camper with some delamination so feel I have strong perspective on this issue.
The problem with delamination will always be substrates in the sandwich which do not use robust glues or materials. Asian made luan plywood being the primary culprit and Filon underlayment made of wood fiber/paperboard being possibly worse. I have a 2000 Lance truck camper and have repaired several sections resulting from the neglect of prior owners. The nose cap being the hardest and least successful had paperboard under the Filon and it had separated into so many layers as to be impossible to reconsolidate. I believe that it is common for there to be multiple layers of separation in the underlayment which will likely prevent a competely successful repair and encourage anyone attempting to fix I themselves to do a thorough and honest evaluation prior to beginning injection of resin to determine where adhesive needs to be delivered. If all the layers aren’t resecured, the repair will be short lived.
Has anyone had an issue with the ceiling panel delaminating in an artic fox fifth wheel? Besides the bubbles in the ceiling it appears the panel that the carpet is adhered too has come loose., or basically delaminated. This is a 2016 29-5t Artic Fox.
My name is Joe Burgio, Forest forum name hotsteamman. I am new to the forum so I am not sure I did it right. I own a 2019 Forest River Forester, class C with a few different areas of delaminating. I immediately took it to the dealer. They had their collision shop look at it. They said trying to repair it would only make it worse. Do you have any suggestions?.
I’m about to tackle the front nose on an Octane 273 ToyHauler. The entire nose is delaminated and the interior luan wallpapered walls have totally rotted away! I’m going to build a new frame for the nose out of aluminum square tubing instead of the wood framing. I will also replace the nose cap panel with two pieces of aluminum diamond pate. Any words of advice before I start my tear down? Retired teacher of teachers and master carpenter. So I have plenty of time and tools.