 One RVer related to us that there’s nothing like the creepy feeling you get when you’ve unhitched your trailer from your tow vehicle and feel the trailer start to move on its own. He described it as a “helpless feeling of doom.” Fortunately the outcome was nothing worse than the burial of the tongue jack foot in the ground and the frightening of his wife, who was inside the rig at the time.
Many would respond, “The old fool must not have chocked his wheels!” It wouldn’t be a bad guess, but in this case, the RVer had chocked his trailer wheels before unhitching. When the same thing happened a second time, he knew something more needed to be done. Proper chocking procedures, and proper chocks for the situation can make the difference between an easy trailer setup, or one filled with anxiety or even worse.
First, a word about chocks, which have been accurately described as, “wedges of sturdy material placed behind a vehicle’s wheels to prevent accidental movement. Chocks are placed for safety in addition to setting the brakes. The bottom surface is sometimes coated in rubber to enhance grip with the ground. For ease of removal, a rope may be tied to the chock or a set of two chocks. One edge of the wedge has a concave profile to contour to the wheel and increase the force necessary to overrun the chock.”
When I was a kid and we trailered a boat, our “chocks” weren’t set up with a “concave profile to counter to the wheel,” but typically were chunks of 4x4s that Dad brought home with him from work as a carpenter. When I started RVing, I used similar materials, and have been known to grab a handy rock when in a pinch.
Typically though, an RVer’s chock is likely to be a wedged shape chunk of plastic with ribs on both the bottom (to keep it from sliding on pavement) and on the surfaces where the tire makes contact. Our hapless and “helpless” RVer who dealt with a rolling trailer was using exactly this kind of chocks, specifically marketed for RV use.
When using wedge chocks, don’t settle for stuffing one on the “downhill” side of a tire. Before unhitching from the tow vehicle, use at least two chocks, one on the forward side of the tire, the other to the rear—even when the rig is “on the flat.” This was the situation of our friend—the rig was level fore and aft, so he chocked the curb side of the trailer and went about unhitching.
 But here’s the problem: While the site was level fore and aft, there was some amount of pitch to the site from side to side. To that end, the RVer had run street side tires up on levelers to account for this grade. After he had unhitched, the force of gravity took the trailer and twisted it, causing the nose of the trailer to veer to the left and back. By this time, the tongue hitch had been “blocked up” (as RVers typically do) so when it started to slide, the hitch foot slid off the blocking and buried itself into soft ground.
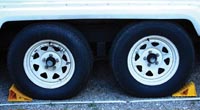
Had the wheels been chocked on both sides of the trailer, this may well not have happened. But when wheels are run up on leveling boards or a leveler “system,” there’s often not enough room to toss chocks under the wheels securely. What’s to be done? A different sort of chocking system is called for.
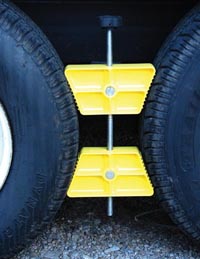
We’ve settled in on a Camco product called “Wheel Stop.” There are similar products on the market by different manufacturers, but their working principle is the same: By effectively placing a wedge between them, the two tires are locked against each other to prevent movement. Since the wheel stop is placed at the center of the tires, it’s possible to “chock” the wheels even when raised up on leveling boards.
To use this kind of chocks, park the rig in place, place the wheel stop between the dual tires and expand them tightly. In the pictured variety, the knob allows hand tightening, but other manufacturers may use a wrench to ratchet out the stops to tighten them in place.
When shopping for this kind of system, it’s important to know the distance between the duals: Measure at the closest point between the tires and purchase accordingly. Many RVers purchase a single wheel stop. That can be used on the side up on levelers, and then conventional wedge-style chocks can be used on the other side of the rig for additional security. And here’s a by-the-way: Plastic wedge-chocks do “date out.” Look for an expiration date printed on them, and get new ones before they date out.
Chocking wheels not only increases the safety factor, but locked up wheels tend to reduce rolling motion in camp, making for a more stable “feel” inside.
Feedback and Amplification
In last month’s Tech Tips on “Keeping Warm in Your RV,” we suggested you might want to keep the main heat off at night and rely on an electric blanket. One of our readers warmed to the subject and told us she’d had a couple of electric blankets that self-destructed when subjected to inverter power.
An industry source confirms that not all electric blankets are compatible with modified sine wave inverter power. The same is true with heated mattress pads. If you’re using a pure sine wave inverter, there should be no problem in operating an electric blanket or mattress pad. Some blankets and pads will take modified sine wave power, others will not.
One source tells us that if you are operating with modified sine wave power, one brand seems OK: Perfect Fit’s line of Soft Heat Low Voltage. If you have any questions as to whether or not your blanket or mattress pad will operate on modified sine wave power, please contact your manufacturer before using it.
Russ and Tiña De Maris are authors of RV Boondocking Basics—A Guide to Living Without Hookups, which covers a full range of dry camping topics. Visit icanrv.com for more information.

Leave a Reply