As age has crept up on us, so have the little troubles that come with it—sore joints, weaker muscles. One area where we’ve found the need for a bit of help is getting off and on the toilet. RV toilets can be on the short side, and installing a riser to give yourself a bit of a lift is not too expensive and relatively easy to do. We’ll walk you through your own “game of thrones.”
Thetford, which makes a number of toilets popular in the RV field, also produces an RV toilet riser. The device gives RV toilets a lift of two and a half inches. Happily, it works not only on Thetford models, but also on toilets produced by other manufacturers, including Sealand.
Preparing the Way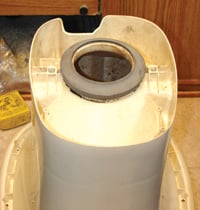 Since you’ll be lifting your toilet off the floor, don’t make the mistake we did—starting with something other than an empty black-water tank. You’ll still likely be dealing with some odors that aren’t real pleasant, but it’s easier if you’re not face-to-face with evil liquids.
The first step is to make sure you have the right tools to remove the toilet. Some toilets simply need an end wrench; others are a bit more complicated, needing a ratchet and socket, plus an extension, and possibly a universal joint. If you are mounting a Sealand toilet, you may want to buy a single new closet seal as it is a bit larger than those used on Thetford toilets. If yours is a Thetford, you’ll find the seals you need in the riser package.
Take a close look at the water supply line that feeds your toilet. Remember, with the extra lift the riser gives to your toilet, you may need to extend (or replace) the water supply line to account for the extra height. In our case, we decided to ditch the old solid plastic water lines and install a new flexible toilet supply line, with the addition of a shutoff valve. In the end we really blessed ourselves for that decision.
It’s not a bad idea to have some cleaning rags and spray cleaner on hand. Once you pull the toilet off the floor, you may find an accumulation of dirt and grime just itching to be sent away.
Pull Out the Toilet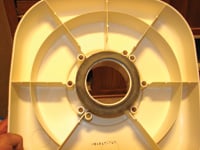 After you’ve shut off the water supply to the toilet, drain the toilet bowl. You’ll be turning the toilet upside down for the installation, so getting the water out is a must. Now disconnect the toilet from the existing toilet mounting bolts that hold it to the floor.
Likely the old toilet flange seal will be hanging onto the toilet for dear life. Too bad! Pull and toss away the old seal and clean up the bottom of the toilet. You’ll also remove the old toilet hold-down bolts; they are useless for the new installation.
Depending on where your water supply line comes in, you may need to modify the toilet riser. Some plumbing lines come up through the floor, and if the new riser will cover them, you’ll need to drill a hole in the riser to accommodate the plumbing line. Thetford’s instructions will provide you with possible locations for the hole.
In our case, the water line didn’t come up through the floor, but from the wall immediately behind the toilet—and in an area impacted by the riser. Rather than trying to cut a hole through the side of the riser, we decided to relocate the water supply line. That got us involved in a bit more complications—the water line was in a “dead space” in a cabinet behind the toilet. This added a considerable amount of time to the installation, but we were happy with the results.
Install the Riser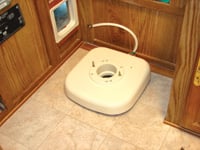 In the kit are two flange seals. As we noted, if you’re installing a Sealand toilet, you’ll use your own new Sealand seal, otherwise put one of the new flange seals from the kit on the bottom of your toilet flange. This gasket forms a new seal between the base of the toilet and the top of the riser. You’ll also install a new seal gasket over the flange on the bottom of the riser. Here you’ll use one of the seals from the riser kit.
Included in the riser kit are two sets of hold-down bolts. The instructions will indicate which of the bolts you’ll use. You’ll position the floor bolts in the floor flange, then line up the riser so the word “front” will be where the front of the toilet will be located. Now simply lower the riser down over the bolts. This is where it gets tricky. Those hold-down bolts probably won’t stand real still, and you’ll be basically threading the bolts through little holes in the riser. Since most RV bathrooms are pretty tiny, you won’t likely have room for a helper to assist you in the alignment process. For some, liberal applications of the appropriate refreshing beverage may be called for.
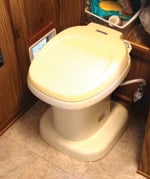
Once you’ve got the riser settled down on the floor flange, it’s time to try and line up the toilet to drop it down over the hold-down bolts. This is a bit easier since the bolts will be less inclined to wobble, now that they’ve been “collared” by the riser. However, you’ll be fighting against the collective efforts of two springy rubber flange seals. Here’s where a helper may be helpful. Have the helper sit on the toilet so his or her weight will compress the flange seals enough to get the bolts to come into reach. Quickly get hold-down nuts tied onto the threads and start running the nuts home. Now get your helper off the pot, and tighten the nuts until all rocking motion is taken out of the installation. If your bathroom floor is carpeted, it may take considerable doing.
 In our case, we fought like mad to get the toilet pushed down far enough to get the top of the hold-down bolts to come through the base of the toilet. At first blush it looked as though we needed the longer hold-down bolts, so we pulled the riser, replaced the bolts with the longer set, and went through the frustrating part of lining everything up. This time the bolts came into easy reach, but alas! When we tightened down the toilet, the bolts were indeed too long, and we couldn’t tighten the nuts down far enough without the tops of the bolts impacting the toilet itself. That meant tearing everything out again, putting in the correct bolts, and by carefully “mooshing” the toilet down to overcome the resilience of the flange gaskets, we actually got some bolt threads in reach of the mooring nuts. When they tell you which bolts to use, believe what you read.
With the toilet firmly moored, reattach the water supply line, turn on the water, and check for leaks.
Final Thoughts
If you want to proceed on this as a project, be sure to shop around. Prices for Thetford risers vary widely. On the Internet you’ll find prices (including shipping) range anywhere from a low of $30 to the mid-fifty dollar range. We phoned two local suppliers and found one retailer, renowned for its low prices, asking $35, while another sold us a new riser for $27.
While this riser will fit all Thetford toilets, and most Sealand models, it will NOT work with Sealand’s 511 and 911 models; nor will it function if your Sealand uses a Sealand “universal mounting unit.”
Russ and Tiña De Maris are authors of RV Boondocking Basics—A Guide to Living Without Hookups, which covers a full range of dry camping topics. Visit icanrv.com for more information.

Thanks for guidline to install toilet riser, it seem not difficlut. I found some people like to buy them along with installing package, save time and more safety
I’m replacing the seals on our riser and toilet. A pro put it in to start with and now it is me. I remember something said about the seal for the riser needing to be place on with the correct side up. It had indicated this was important. What side were they talking about?