 If you’re an avid nighttime bookworm, you probably already know that the typical lighting scheme offered by most RV manufacturers is woefully inadequate. Either the lighting is too far away, too dim, or just a pain in the neck to turn off when drowsiness arrives. Solution? Read by flashlight (and get a stiff arm) or install a reading light or two over the bed.
If you boondock away from shore power resources much, then think “energy efficiency” when you shop for a new reading light. There are some excellent LED reading lights on the market, but bear in mind as a rule to thumb: the more LEDs in the light, the greater the light output. Skimping on price may not make your life happier in the long run.
Preparations
Identifying where to put the new reading light is the first step in the project. You’ll want to have the light fairly close, say within a couple of feet from where you’ll need it. In one fifth wheel installation we found the ideal location was under a cupboard since the bed slid directly under the cupboard and in fairly close proximity. In a recent installation in a travel trailer, the over-the-bed cabinet was almost 40 inches above the mattress—way too far from where the light was needed. There was an existing under-cabinet light where we could get the needed electricity, but the actual reading light had to be mounted beside the bed, much closer to the mattress.
In the typical RV bedroom setup, manufacturers will place an under-cabinet light fixture in fairly close proximity to the bed. If your new installation point is also under a cabinet, so much the better. If you’ll need to bring it lower, then your mounting surface is best on a cabinet wall, provided you have a power source within reach—preferably in that cabinet or one that immediately touches it. If you are using anything other than an LED lamp, heat is also a consideration. Allowing curtains or other combustibles to come into contact with the light is a definite no-no.
 Once you’ve got your light location scoped out, you’ll need to ensure a power supply is available. Again, if there’s an existing light fixture in the cabinet, chances are good you can tap the wiring for your new light. Of course, if you open the cabinet you won’t likely find the wiring at all—it’ll be in a dead space, likely between the lowest shelf in the cabinet and the outside base of the cabinet. Accessing the wiring means removing that lowest inside shelf, typically held in place with staples. Look closely for the hardware holding the shelf in place. If stapled (or finish nailed) in place, carefully use a small pry bar (or ever more carefully a flat blade screwdriver) to gently pry up the material. Begin to pry and pull up just a small portion, then move the tool a few inches from the starting point and pry more, repeating until you have removed the shelf material.
In the dead space you should find the wiring for the existing light fixture. While there is no “industry standard” color-coding scheme, some manufacturers use black for “hot” or positive voltage, with white as the negative side. If you can see the existing light fixture, the hot or positive side should be the wire that is connected to the fixture’s off-on switch, with another wire leading from the switch to the light fixture’s circuitry. To be completely sure about wiring polarity, use a digital voltmeter to make the determination.
You’ll need to measure how much wire you’ll need for the installation. If the new light will go directly under the overhead cabinet, very little will be required, but if you’ll be putting the light into the sidewall, measure carefully and add a little to the figure. You’ll also need wire connectors; normally we recommend crimp-on connectors, but in our installation, we had to splice several wires together to make the job work, and we were stuck with twist-on connectors, which we beefed up by adding a few wraps of electrical tape over the connector and associated wire to preclude vibrations from untwisting the connection.
 When purchasing wire, be sure get a large enough conductor. If you don’t have a wire chart, you’ll find one on the Internet, or the folks in the electrical wire section of the hardware store can probably help you figure out what size you need, based on the current consumption of the new light fixture, and the length of the wire run to serve it. In our example installation, we used rubber coated lamp cord (zip wire) and regretted it. This particular stuff was hard to pull the insulation from, and didn’t want to split down the middle. Next time we’ll simply use single conductor stranded wire. Always use stranded in an RV installation, as road vibrations can break solid wire.
Once you’ve figured out wiring polarity, it’s best to turn off the power to the lighting circuit. This may mean simply removing a fuse, or disconnecting the house battery (and turning off the shore power if connected).
Step-by-Step Installation
Let’s walk through a typical installation, in this case, one where two new reading lights were installed on opposite sides of a bed, on convenient sidewalls provided by hanging garment closets.
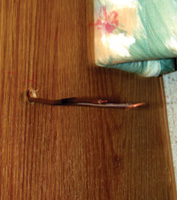
We wanted to keep the existing under-shelf light for general use, while adding the two reading lights. This required blasting a hole into the adjacent hanging closets to run the wire to the new light locations. Keep the holes as small as possible without cramping the wire. In our case, the new light locations were several inches below the level where the wire came through from the dead space, so after routing the wire out yet more holes where the new light fixtures would hang, we used Gorilla tape to hold the wire run tight against the inside of the closet wall. The wall partition between the inside of the closet and the outside was simply a single chunk of paneling, so using wire clamps with screws or wire staples was out of the question.
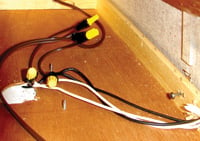
We determined which wire running to the existing fixture was hot, and opened it up. Two new leads were attached to the existing incoming hot wire, and a fourth wire had to be spliced in as well—the one to operate the existing fixture. Hence the need for a twist connector, as we couldn’t find a crimp connector large enough for four wires. Similarly we had to open the positive side of the circuit and tie in the wires running to the new fixtures.
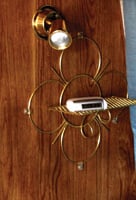 Observing polarity, we connected up the wires to the new light fixtures, and before mounting the fixtures, we flipped the power back on and did a “smoke test” to assure ourselves we’d hooked everything up correctly. With that check done, we mounted the fixtures, and then returned to the “dead space” in the upper cabinet. We’d already used a shop vac to suck out all the debris left from drilling wire holes. Putting the “cover” back on the dead space is a matter of doing your best to urge the previously used staples to go back in the cabinet framing. You may wind up pulling the staples and reinstalling with small nails or brads, or possibly opt for appropriate wood screws.
Installing new reading lights isn’t a complicated process. It is one that requires patience and probably more time than you think. The end result though, if you’re a bookworm, is an enhanced, comfortable reading experience. Even if you’re not the bookish sort, reading lights make for a whole lot more romantic lighting that the typical OEM lighting.
Russ and Tiña De Maris are authors of RV Boondocking Basics—A Guide to Living Without Hookups, which covers a full range of dry camping topics. Visit icanrv.com for more information.

Leave a Reply