If you got one of those “oldie but goodie” RVs, you’re probably still limping along with the original RV stereo system. Please don’t tell us it’s got an eight-track player—our tape cassette was bad enough. When much of our music started showing up on CDs and more modern digital formats and the old cassette player chewed up a couple of our vintage tapes, we knew it was time to change up. Maybe it’s true for you—and it isn’t all that hard to do.
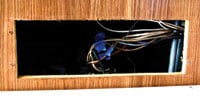
Making the Change The change to newer technology usually means a far smaller unit, and better tuning technology that assures sharp radio reception and clear music. At the same time, pulling out the old unit will often leave you with a big hole that won’t be entirely filled with one of those units with newer technology. That was true in our case, where our “almost as big as a breadbox” unit was replaced by a new digital system that fit in a hole three inches in diameter.
Here’s a chance to prove up your wood butcher skills.
The first order of business is deciding just what you want (or need) in your new multimedia system. As much as we like our CDs, the lure of a small, compact unit with no moving parts to get dust in them or be rattled by boondocking roads was too much to pass up. Our new system was designed specifically for the boating industry—it is watertight and tough. Prospec Electronics PRV-15 features a single AM, dual band FM, 40-watt four-channel output, with inputs for auxiliary stuff (like a CD or MP3 player) and a USB port. We latched onto the USB idea because we could easily transfer a lot of our favorite tunes (and audio dramas) to a USB flash drive, saving a lot of space and weight over CDs.
 There are many other options available. Your local auto parts store or even Walmart can set you up with plenty of car-media equipment. Or if you have plenty of cash, a car-stereo specialty store can hand off the goods.
Next, what about your existing speakers? We weren’t real impressed with the sound we were getting from our setup, but decided to wait to replace the speakers until after we’d installed the new multimedia system. It proved a fortuitous choice.
Out With the Old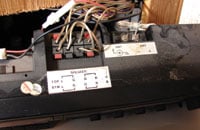 Removing your old system is relatively straightforward work with screwdrivers and wire cutters. However, once you unscrew the mounting system and pull the old stereo out, STOP before clipping wires. A diagram on the top of the old system gave us color codes for wires, but it didn’t tell us which speakers were which. It was a matter of powering up the old stereo, then removing a set of speaker wires one at a time to determine which speakers were front and rear, and left and right.
You’ll find that your speaker connection system is “polarized,” in order to keep the speakers properly fazed. Our incoming speaker wires were color coded, gold and silver. We assigned gold to the positive (+) phasing and silver to the negative (-) phase. Either color could have been assigned to + or to -, as long as you’re consistent between the speakers. We used masking tape and a marking pen to specifically note what each wire was assigned to.
Our old stereo had the speaker wires go directly to lugs on the back of it. Many car stereos utilize a harness and plug system. If you ever plan to re-use the old stereo, you’ll need to clip the wires off on the side farthest away from the stereo so that the harness and plug can be used again.
In With the New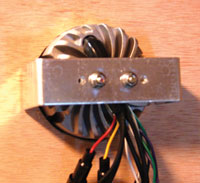 After we’d removed the old unit, we made a trip to the lumberyard, where we bought a chunk of birch plywood. We measured the hole in our cabinet left over after evicting the old stereo, and made sure the new plywood blank would overlap the hole by about a half-inch on all four sides. We could have used a “1 by” piece of solid material as well, but the birch ply had such a good-looking veneer, and it matched the grain of cabinets near the new installation.
Using a drill and jigsaw, we cut the required three-inch diameter mounting hole for the new stereo. Had we had access to a three-inch hole saw, that would have been a better choice, and a lot quicker. We also bored a 3/4-inch hole close to the three-inch hole to allow us to fish the USB port connection through. The readied plywood was carefully sanded.
Here is where things got awry for us: Time constraints didn’t allow us to stain and finish the new stereo “blank,” before our RV was called into service. The stereo had to be mounted up for the trip before the work was finished. We’ll have to yank the unit back out and do the finish work in the near future.
 Mounting the new multimedia system meant pushing it into the hole from the outside of the blank toward the inner side, then attaching a provided mounting bracket to the back of the unit with a couple of screws. The MILPRV-15 bracket is scored with break lines to allow you to adjust it for various thicknesses of mounting material.
Following the wiring diagram included with the unit, we attached the speaker wires to the pigtail wires coming from the unit. Using small crimp connectors is likely the best way to ensure your connections stay put, but you could also use small wire nuts.
The electrical connection gave us a bit more of a pause. The MILPRV-15 “looks” to see two 12-volt connections, plus a ground. One “hot” connection is on constantly, the other, an “ACC” lead, would look to see power when the ignition is fired. For a motorhome installation, that might be a natural, but in a towable unit, there is no “accessory” circuit. We simply put both the hot wire and the accessory wires together against the trailer’s “hot all the time” 12-volt power lead.
Smoke test time! We punched up the power and hit the scan button for FM stations. It was immediately obvious that part of our poor speaker performance was actually due to the old, scratchy stereo system. We may just leave the original factory speakers in place and carry on with them.
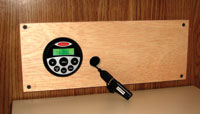 All that remained for us (aside from that future stain and seal operation) was to zip four screws into the media center “blank” and learn the tricks that come with operating a new piece of equipment. Our RV travels are now “sound in all respects.”
Russ and Tiña De Maris are authors of RV Boondocking Basics—A Guide to Living Without Hookups, which covers a full range of dry camping topics. Visit icanrv.com for more information.

Leave a Reply