Priced an RV water heater lately? It’s not a pretty thing—even with high fuel prices, you could buy a lot of miles for the cost of replacing a heater. A few minutes and a very few dollars can go a long way to preserving your rig’s water heater. We’ll show you how.
The Great Sacrifice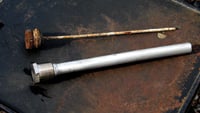 A leading cause of failure of water heaters is a tank that leaks. What causes a leak? Corrosion of the tank metal, often through electrolysis—the flow of electrical current. Of course, most RV water heaters aren’t fired with electricity, but stray currents can turn up in your gas-fired water heater. Just the flow of water through pipes can actually create a small flow of current. Add water in the tank, and your system is ripe for rusting out.
Enter the “sacrificial anode.” All metals are reactive to current; when two metals are placed together in water, the one that is less reactive will not corrode, while the other that is more reactive to current will sacrifice itself—corrode away—preserving the other. Since we want to preserve the metal of the tank, an aluminum anode (more reactive than steel) will preserve the typical steel tank. In the case of an aluminum tank (typically an Atwood tank or one of Suburban’s 10-gallon models), a magnesium rod, being more reactive, will save the aluminum tank walls.
Anode rods have a small steel core, covered over thickly with the appropriate metal. Once the anode material is eaten away, it’s time to replace the rod with a new one. How often will an anode rod need replacing? Many factors come into play, so regular inspection is the best way to preserve your water heater tank.
Get the Crud Out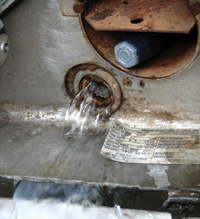 First up, turn off the water heater and its water supply. If the tank is hot, it’s best to let it cool down before starting the project as you’ll be draining the tank. Drain the tank completely by removing the old anode rod, or pulling the plastic drain plug. Possibly your heater is equipped with a drain-down petcock. If that’s the case, open both the petcock and pressure relief valve to speed up the drain process. When removing the drain plug or anode rod, be sure to stand clear, as you’ll have a gusher.
If your water heater already has an anode rod, you’ll spot it. The outside end of an anode rod looks like a large hex bolt head. Indeed, the typical anode rod is removed with a 1 1/16th-inch socket. Trying to break loose an anode rod with an end wrench will most likely result in frustration, unless you have a very large offset on the wrench. We’ve found a half-inch ratchet drive socket with a three- or four-inch extension is just the trick. If the rod has been in a long time, it can be a difficult yank. We used a bit of penetrating oil to help ease the way.
What if you don’t have an anode rod? Likely you’ll find a plastic drain plug that has the same diameter and thread set as a new anode rod. Yes, you can pull the drain plug and replace it with an anode rod for greater tank longevity.
Once the tank has drained completely, leave that big old hole open, and turn the city water back on to thoroughly flush water through the tank. This will flush out scale and crud from the tank, although you may find that a large bit piles up at the bottom of the “neck” of the drain hole. Dealing with this little area can be a pain; you can buy a water heater flush tool that ties onto the end of a garden hose. We didn’t have one handy, but found that by leaving the flush water on low we could insert a flexible stem brush in the drain hole, spin the brush around, and get the sediment to move on out. When the crud’s gone, shut off the flush water.
Installing the New Rod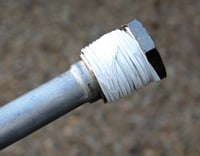 With the appropriate anode on hand (look for them at RV supply stores, around $9 to $15) it’s time for the installation. Camco, the manufacturer of our anode rod, recommends wrapping the rod’s threads with “1 1/2 turns only” of Teflon tape. The only thing we can make of that is run one complete wrap of the tape over all the threads, then complete by running one more layer of tape halfway from the “inside of the tank” back toward the “wrench” side of the threads.
Insert the wrapped rod into the tank threads and carefully try to start the threads by hand. It can be a bit of a chore, as these puppies can be tight. Persevere, and once started, gently thread into the water heater with the wrench. Don’t over tighten, 7 to 8 foot-pounds of torque is all that’s needed.
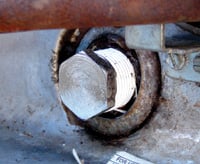 Close the pressure relief valve and turn the water supply back on. Inside the rig, open a hot water tap and let things flow until all air is bled from the system. With the pressure up, check your new anode rod for leaks and gently tighten a bit more if need be.
How often should you check the anode rod? Camco recommends a once-a-month schedule, but somehow we don’t see that happening. Certainly you’ll want to check it as frequently as you can to get a handle on how fast your own situation eats up the rod. Remember, once you’re down to the steel core, the protection is gone, and it’s time for a new sacrifice.
Russ and Tiña De Maris are authors of RV Boondocking Basics—A Guide to Living Without Hookups, which covers a full range of dry camping topics. Visit icanrv.com for more information.

Can the hole that the Aluminum Anode Rod goes be retread because the not tread left on it. The rod with not go in.we bought it this way second hand. Help me please tell me what I can do.