 High on the list of the top 25 factors in traffic accidents is night driving. Your risk of being involved in a motor vehicle accident almost doubles when day changes to night. Nearly 90 percent of all decisions drivers make are based on what is seen. If your headlights aren’t delivering the light that they should, your chances of getting in an accident are increased.
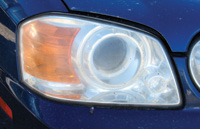
With the advent of replaceable headlight lamps came acrylic headlight lenses. Because these characters are subject to UV radiation, yellowing or hazing over time is a common problem. With the haze comes a degradation in the amount of usable light your headlights produce. While plastic lenses can be replaced, it’s an expensive proposition—enter headlight restoration treatments. From pastes and polishes to physical treatments requiring an electric drill, all of them claim to make your headlights shinier and produce better light.
After the Consumer Reports testing organization tried out various products, we settled on one of its higher-rated products, the 3M headlight lens restoration kit. While the testing group suggested about a $17 price tag, we paid $23 at an AutoZone store off-the-beaten-track in California.
 Sand and Smear
The 3M kit works in a way that seems counterintuitive. You start by scratching the daylights out of your headlight lenses with rough sandpaper, then work your way through finer grades of sandpaper, finally finishing the job by buffing out the lenses with rubbing compound. Before you buy the kit and undertake the process, get out your glass cleaner and towels and simply try cleaning the lenses. If that doesn’t work and you see a lot of haze or yellowing, proceed.
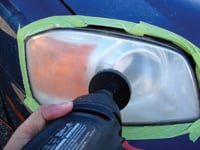
The first step is something we’ve already urged: a thorough cleaning of the lenses with soap and water. After that, dry off the lens and the surrounding area. The 3M kit includes a small roll of masking tape that you should use to mask around the lens. Don’t skip this part. In fact, you may want to double the layers of masking. This protects the vehicle’s paint from the process, as a slip in the sanding phase can really ruin paint in a hurry. If the vehicle has paint that is chipped, peeling, or isn’t bonding well, don’t even start. The tape could peel away the paint, leaving you with a real mess.
You’ll need an electric drill that develops 1200 to 1600 rpm, so you’ll likely be looking at a corded style drill. Any slower and the process just won’t work, and faster than 1600 rpm can damage the headlight lens. In the kit is a disc pad holder that fits in the drill chuck.
 The process uses a series of two different grades of sandpaper, followed by a “Trizact” foam disc, all of which progressively sand out finer and finer. If you had any sort of see-through-ability with your lens to start with, that will vanish with the first sanding disc. You’ll sand away with the drill flat or at a slight angle, carefully and slowly moving back and forth across the lens. Hold firmly with both hands, as the disc can easily skip away and onto your vehicle paint. Ouch!
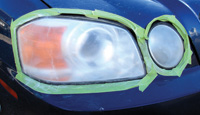
By the time you’ve worked your way through the steps and have wound up at the use of the foam disc, the lens will look about as clear as a standard household light bulb. Enter the use of the foam disc, and you’ll be heads-above if you have a spray bottle of water for the foam work. By keeping the foam disc wet and repeatedly working the lens, you’ll develop a white, slurry-like substance, and low and behold, the lens will start to clear up.
Once any coarse scratches are gone, it’s time to move up to the last part of the kit, an orange foam pad and rubbing compound. A small amount of compound is put on the pad, and before you start up the drill, you’ll want to smear the rubbing compound around on the lens. We missed that step just once and found out why you should smear first: Flying splatters of rubbing compound make a real mess! After a number of applications of rubbing compound and multiple passes of the buffer, we were ready to peel off the masking tape and clean the lens with a soft cloth.
Showroom or Safety?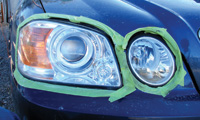 The appearance of the headlights after the whole process was amazing. We had started out with a toad car that had milky-looking headlight lenses, both on the low and the high beam side. With an investment of about a half-hour and less than $25, the lenses looked incredibly better. But our concern wasn’t so much showroom finish, but safety.
What had really urged us into this trial was driving a similar model toad car six years newer than ours. The night driving in the new car was so much better in terms of road visibility. After de-hazing our vehicle, we took it on a 2,800-mile “test drive.” OK, we didn’t go on a long trip just to test the headlights, but hey, it was a good, solid test. The results were outstanding. Even on low beam, our visibility factor had increased dramatically.
While 3M warns that badly hazed lenses might require more than one kit, our vehicle must not have been so bad. We had enough sanding discs and rubbing compound left over that we were able to de-haze our tow vehicle’s lenses too. By the time we got done with two rigs, there wasn’t much left of the Trizact disc, but we’d have been happy just to have gotten one vehicle done for the price.
Russ and Tiña De Maris are authors of RV Boondocking Basics—A Guide to Living Without Hookups, which covers a full range of dry camping topics. Visit icanrv.com for more information.

Leave a Reply