 After a long day in the saddle you finally make it to the campground. In the back of your mind, you can hear the shower beckoning. Being the proud owner of a dinosaur RV, your water heater isn’t one of those fancy “flip the switch and go” jobs; rather you have to light the pilot.
You set the burner control valve to “pilot,” and press the pilot light control button and toss some flame down on the end of the pilot light burner. The flame is good—and you wait the obligatory 30 seconds or so, then release the pilot light control button. As if by magic, the pilot light vanishes! So you repeat the process until you’ve burned your fingers with matches, or turned the air blue with some unrepeatable language.
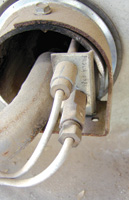
The most common cause of this problem is a faulty thermocouple. A thermocouple is a safety device designed to shut down the gas valve should the pilot light go out. The “business end” of the thermocouple is a metal piece that lies about 3/8 to 1/2 inch into the pilot flame. A metal connector leads back to a threaded connector that screws into the gas valve. In practice, heat produced by the pilot flame is converted by the thermocouple to electrical current. The current holds an electromagnetically controlled valve open, allowing gas to flow. No current, valve shuts, gas stops flowing.
Thermocouples eventually reach an end to their useful life. To test them, you’ll need to take them out of their appliance and use a digital electrical tester with a millivolt scale. It’s an easy job and can save you no end of frustration.
“Mr. Safety” here: It’s a good idea to close your rig’s propane gas valve(s) before you embark on this journey. Since propane gas is highly flammable (and concentrations of it can explode) if you feel the least bit “not up to the job,” get professional help.
You’ll need to identify the thermocouple in your unit. Inside the main burner there will be an assembly containing both the thermocouple and the pilot flame burner. The thermocouple is cylindrical and sits in the pilot flame; hence it will be the topmost of the pilot burner/thermocouple combination.
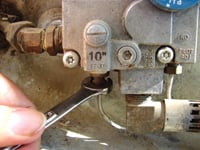 To remove the thermocouple, chase the connecting wire (or sometimes it looks like a tube) back to the gas valve and use the appropriately sized open-end wrench (typically 3/8-inch) to unscrew the threaded end from the gas valve. Gas valve? That’s the metal box with the control knobs on it. Now remove the sensor bulb from the pilot light assembly. You’ll find that on the other end of the wire-like connector coming from the fitting you took out of the gas valve.
Now set your digital voltmeter to the millivolt scale. Connect the positive lead to the button on the end of the threaded fitting. Connect the negative lead to the jacket of the thermocouple. Here’s where it gets tricky: You’ll need to put the sensor bulb in a live flame (a lighter is fine) for about 45 seconds. Get an assistant with asbestos fingers or use a pair of pliers.
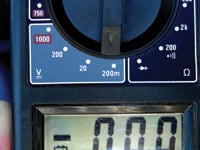 After 45 seconds the voltage reading produced by the thermocouple should read a minimum of 12 millivolts; ideally the reading will be around 26 millivolts. If less than the minimum, replace the thermocouple. If the thermocouple readings fall in acceptable value, then you may be looking at a bad gas control valve.
Putting the new thermocouple back in is a simple “reverse order” job. But beware: when replacing a thermocouple, screw the fitting in to finger tight, then wrench turn 1/4 turn more. Any more than that can damage the thermocouple, rendering it useless. Now open your gas valve(s) and fire up. It’s shower time.
Russ and Tiña De Maris are authors of RV Boondocking Basics—A Guide to Living Without Hookups, which covers a full range of dry camping topics. Visit icanrv.com for more information.

Thanks; clearly written