 For the RV do-it-yourselfer, fixing electrical problems is never too far away. A big part of RV electrical repair work involves putting wires together—making that big connection. When it comes time to join those wires, how do you do it?
Sad to say, some RVers, being unacquainted with the stresses that work on RVs, simply twist wires together, slap a little electrical tape over the connection, and blissfully head off down the road. A little vibration, a little moisture, and that fix will soon come apart—possibly with disastrous consequences.
Others take a step further: After twisting the connection together, they add a wire nut, which technically is a trademark name for a twist-on wire connector, although in the United Kingdom you’ll find such connectors sold under the name Scru-It. Hey, we don’t make the names up, we just report ’em. In any event, personal experience and advice from professional techs often points up that twist-on wire connectors often don’t hold up to the rigors of the shaking and baking that an RV puts them to. We’ve had them fall off, burn out, or otherwise give up the ghost.
What’s to be done? There are a couple of options. One approach is the use of crimp connectors. These are dandy devices, made to join solid or stranded wires, or set up to connect to screws via various forms. How they work is relative simplicity: Simply strip the insulation back to the proper length, insert it up into the connector, and crimp the connector tight over the wire. These are virtually flawless connectors, and resist the usual problems in RV wiring systems of vibration, and extremes in temperature.
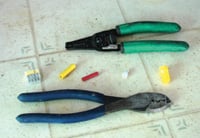 The problem is when users try to crimp with something other than the proper crimp tool. A pair of pliers, a lineman’s tool, a hammer, vice grips—these tools aren’t designed to properly crimp a crimp connector, and they will often part ways after being connected. Even a cheap crimp tool is better than using one of the alternates. But if you really want to splurge, then check out a fancy ratcheting crimp tool. Easy on the hands, these characters crimp with uniformity each and every time. They aren’t cheap—we saw a set that ran almost $80. I’ll be sticking with my $10 pair for a long time, but whatever fits your pocketbook will go a long way to making solid, dependable electrical connections. While you’re shopping, buy yourself a good wire stripper. Removing insulation from electrical wire with a knife is asking for a nick in the wire, a cut finger, or both.
Here’s a tip with the use of a crimp tool. Always TEST the connection for sturdiness. Give the wires a good tug to ensure they won’t come apart. Our crimp tool has three different jaw arrangements. We’ve found it best to do an initial crimp with one jaw, then move it down to another jaw and give it another bite.
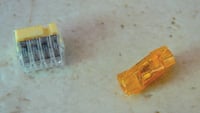
We’ve also found a liking for yet another connector system: In-Sure Push-In wire connectors, marketed by Ideal. These connectors have “ports,” wherein you strip back your wire insulation and simply push it into one of the ports. Strip off the next wire you want to connect, push it into another port. The connector electrically connects all wires. Need to join more than two wires? These connectors come in a variety in terms of the numbers of ports and allow various wire sizes to be used on the same connector. For example, you could connect a small 18-gauge wire into a circuit with a couple of large 12-gauge wires.
What we like about these connectors is the ease of connecting up, and the fact that they simply won’t jar loose under vibration. If you need to take the wires loose, you can insert a small screwdriver and push a release tab to free the wire. They’re designed for copper wire, and most allow stranded or solid wire.
Yes, we occasionally find it necessary to use the old-school wire nuts. We eschew the use of plain, rounded wire nuts, and use only those equipped with “wings” that allow a much firmer grip to be applied when cinching down the nut on the wires. Again we do a good “tug test” to ensure the wires are firmly gripped, and then add an extra margin of safety: We wrap a small length of electrical tape around the wire nut and the wires themselves to encourage the wire nut to stay put.
Finally, play it safe. Whatever connectors you work with, be sure to be safe and size them to the wires you’re connecting. A loose connector can lead to catastrophe.
Russ and Tiña De Maris are authors of RV Boondocking Basics—A Guide to Living Without Hookups, which covers a full range of dry camping topics. Visit icanrv.com for more information.

If you read the instructions for nearly all crimp connectors, they are not intended for solid wire but for stranded wire. You might get by them if you twist the solid wires together first.
Wire nuts do work reliably if you install them properly. Here is the most reliable way to install them:
The wires must be carefully aligned at the ends to prevent recessed wires from being pushed back as the other wires engage the spiral conductor in the nut. Hold the wire bundle in proper alignment with a wire tie about 3/8” back from the stripped region and fully tightened. Now thread the wire nut onto the wire bundle. As the nut becomes difficult to turn, hold the wire bundle with needle nose pliers on the wire tie, and finish tightening the nut.
If a stranded wire is included with the solid wires, it must be stripped about 1/8” more than the solid wires, and the end of the stranded wire must extend about 1/8” beyond the ends of the solid wires. If you fail to do this, the stranded wire will be pushed away as the solid wires engage the spiral conductor in the nut.