Spring has sprung and that means it’s time to take the RV out of hibernation. Before heading out on your first RV trip of the year, spend an afternoon going through your unit to make sure everything is in proper working order.
If you took the proper steps in winterizing your RV, it should be ready to go with minimal preparation.

Check all tires for proper air pressure. Photos by Dave Helgeson

Open your windows and let your rig air out.
Below is a handy checklist to get your RV ready for a spring camp-out:
Exterior
- Check the tires for proper air pressure and cracks in the sidewalls. Don’t forget the spare.
- Check the unit for any damage. (Tree limbs that fell over the winter, rodents that may have entered the RV, etc.)
- Remove any protecting covers, outside and inside.
- Check the outside components. (Cracked side vents, missing light covers, baggage door operation, turn signals, etc.)
- Check to make sure your license plate tabs are current.

Check your water heater.
Interior
- Open windows and roof vents to air it out and make sure all the windows and vents are in working order.
- Give the inside a thorough cleaning and check for unwanted visitors, such as bugs, mice, etc.
- Vacuum carpets, inside the cabinets, under the dinette seats and sleeping areas.
- Make sure you have an up-to-date and fully supplied first aid kit. Double check expiration dates.
- Check towels and linens that may have been removed for the winter. (Bedding, blankets, pillows, washcloths, beach towels, etc.)
- Click here to make sure your fire extinguisher is not part of the nationwide recall of Kiddie brand extinguishers. Obtain a replacement if necessary.
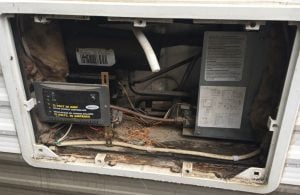
Make sure your RV’s fridge is in proper working order.
Operating systems
- De-winterize the unit and flush the freshwater system.
- Check the freshwater system for proper operation. Don’t forget to check both the water pump and city water hook-up. Test all valves including faucets, outside shower, and toilet.
- Flush and fill the freshwater tank. (Fill it completely full at least once a year to check for leaks in the upper part of the tank, fill hose and vent tube.)
- Make sure the carbon monoxide detector, smoke alarm, LP detector, and fire extinguishers are all in working order. Install fresh batteries for those that aren’t tied into the RV’s electrical system.
- Check the battery. Make sure the water level is correct, it is fully charged, and terminals are tight.

Clean the A/C.
- Check the water heater on gas and electric if so equipped. Make sure the gas burner tube is clean and nothing has nested in it during the winter. If equipped with bypass valves, be sure they are returned to the “summer” position. Note: Never operate the water heater on electric unless the tank is full of water.
- Take the propane tank(s) to be filled. Many states require the tanks be recertified after a set period of time. If your state is one of them, ask the filling attendant how much longer you have until your tanks are due for recertification and act accordingly.
- Check all appliances for proper operation. Wipe out the refrigerator and check operation on both gas and electric.
- Check and clean the air conditioning filter.
Finally, make sure your public land passes are current: US forest service pass, trail passes, state trust lands, etc.
Avoid an unpleasant adventure in RVing by making sure your RV is ready before your first camp-out of the spring. Drive safe and enjoy!

Check that your Black and Grey water tank dump valves are closed. Never know if someone fiddled with them while the unit was in for winter storage.
We had situation a few years ago, where we took our unit out of storage… thought we had done all our preseason checks. Set out on a three day trip from Canada to Kissimmee, Fld. during our travels we used the facilities but did not use full hook-ups. Once we set up at our destination… opened the protective cover to the drain pipe only to be drenched in black tank water.
Note to self…. Check all valves before opening the drain covers. GPG
Guy Giroux please contact me privately please. 😎
bobtyszka@gmail.com
Thanks!
It would really be great to have this in a PDF format to save on my phone.
Terry, you can print this article and save it as a PDF on your computer rather than printing it on paper, as long as you have access to a printer network. That’s what I’m going to do!
It would be nice if the the last part of the tank pipe were clear,so you could see what lie ahead..lol
David,
great idea……they make a clear elbow with water hose connector.
it would be just as easy to make a clear straight section OEM installed at the manufacturer.
Good comment by Guy Giroux. Another inspection should be your drain hoses and connectors. We once set up to dump and had a leak at the hose connection because one of the catches was broken.
and mess was made at the dump station..
Early in my camper ownership I learned (the hard way) that the valves need to be closed with a very firm hand. After successfully dumping both tanks during my first trip I closed them, filled the fresh water tank and toodled off on my merry way. A week or so later I found a much-needed sani-dump and blithely popped the drain cover off … to find that the valve had not shut completely. I slammed the valve down, but not before I realized that I had completely wasted the shower and clothes change from just a couple of hours earlier. Since that day the first thing I do upon opening the door is ensure that the valves are fully closed. (As a good RV citizen I cleaned the dump site better than it had been when I arrived)
Also, I NEVER take the cap off before donninhg my rubber gloves. I watched a guy do it without gloves. He said the same word that he covered his hands with.
My current camper has a lock on the door, but I will ALWAYS give a firm push on each valve before I dare to take the cap off.