
Dump Your Tanks Like a Pro
RV sewer dump anxiety is a very real thing. The memory of Robin Williams at the RV dump station in the 2006 movie RV truly haunts many newbies to the RV lifestyle.
Rest assured, in real life, dumping sewage at an RV dump station (sometimes called a sani-dump) is a very easy and uneventful process. The key is to be prepared and have the right tools. Here is how to leave your anxiety at the RV dump station once and for all.
What do you need to dump your RV waste tanks?
You don’t need much to dump your tanks, but here are the essentials you will want on hand at the RV dump station.
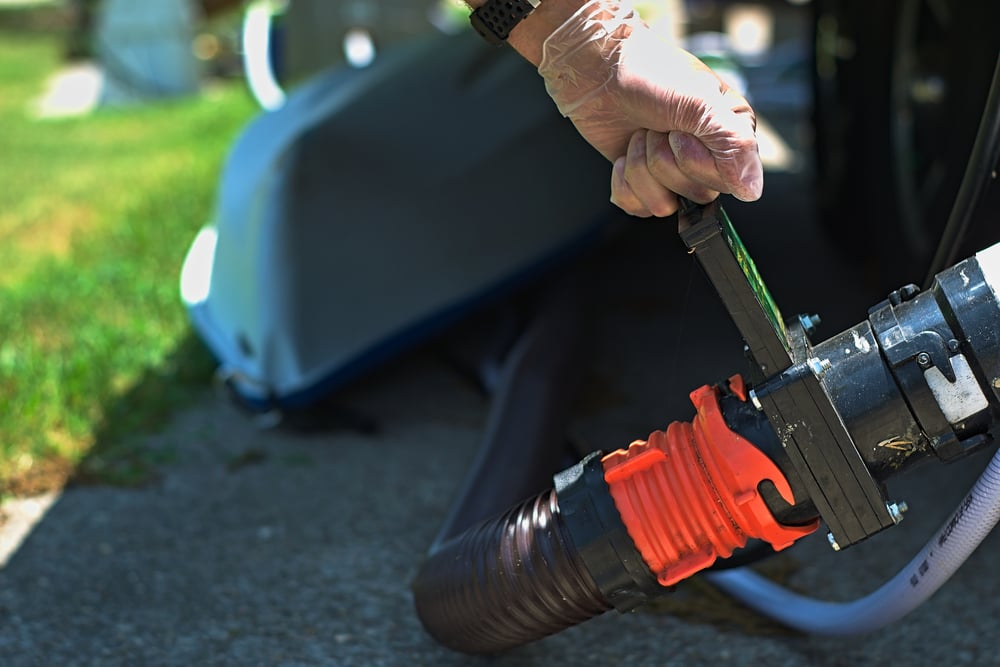
- RV sanitation gloves: These will protect your hands from icky germs and bacteria that can be on sani dump equipment.
- A sturdy sewer hose with end caps and a transparent elbow: Sometimes new RVs come with a flimsy blue RV sewer hose. These are a nightmare to use, so get rid of this one (small animal shelters and rescues appreciate these unused sewer hoses). A good RV sewer hose will prevent spills and RV sewer dump anxiety. We recommend using the Camco Rhinoflex Sewer Hose Kit.
- A dedicated black tank flush-out hose: This hose is usually orange and is used only for flushing your black tank or grey tank after you dump.
- RV holding tank treatment: You will want to add this to your black and gray tanks after dumping in order to keep odors at bay and everything flowing smoothly when it’s time to dump again.
A Forest River Forums member also recommends a tote to easily carry all your accessories at the RV dump station.
“You’re going to want a “tote” of some kind for accessories. Only the hose will store in a typical caddy.”
Know the difference between an RV black tank and gray tank?
It’s important for RV newbies to know the difference between their RV holding tanks. The black tank holds the blackwater, including everything that you flush down the RV toilet. The gray tank holds gray water, which includes everything you flush down the kitchen/bathroom sink or shower. Check out these useful RV Gray Water Hacks if you are camping off-the-grid without access to an RV dump station.
And learn to get rid of black tank odors
Using an RV wastewater treatment will keep your tanks from getting stinky and will help keep everything flowing smoothly at the RV dump station. Most of them work with water, so add water to your holding tanks, and then add the treatment, as per instructions on the package. You may also want to try these tips from Do It Yourself RV.
Get In, Get Out, with these RV Dump Station Tips
- Pull in to the RV dump station with the sewer outlets on the same side as the sewer dump.
- Put on your RV sanitation gloves.
- Attach the transparent elbow to the sewer hose.
- Firmly place the transparent elbow into the sewer dump inlet.
- Firmly attach the other end of the sewer hose to your RV’s sewer outlet valve.
- Completely open the black tank valve first by pulling on the handle. You should hear a “woosh” and then you will see the effluent moving through the clear elbow into the sewer dump. The black tank will be empty when you can no longer see effluent.
- Be sure to close the black tank valve.
- Completely open the gray tank valve. You will hear a woosh as the gray water runs through the clear elbow into the sewer dump. Leave the gray tank valve open until you can’t see the effluent moving through the clear elbow.
- Close the gray tank valve.
- Open the black tank valve.
- Firmly attach your dedicated RV black tank flush-out hose to your RV’s black tank flush intake. Attach the other end of this hose to the RV dump station water tap.
- Turn the water on. Keep flushing the black tank until the water runs perfectly clear through the transparent elbow.
- Turn the water off.
- Close the black tank outlet valve.
- Detach the dedicated black tank flush-out hose from the RV.
- Rinse the inside of your sewer hose with the RV black tank flush-out hose.
- Put everything away before you leave the RV dump station and congratulate yourself.
Popular Youtubers Long, Long Honeymoon shared their Top 10 Tips for Surviving the RV Dump Station in this video:

I use a short piece, about 4 ft long, of plastic gutter to support the hose when dumping. This gives a better flow and keeps the hose off of the ground/
You need to switch the flushing of the gray water and black water tank. Flush the black water tank first. Yes still with water till it runs clear. The gray water then flushes out the hose when done.
I would agree with everything in the article. I would only add that a small bucket is handy for me. It seems on my coach, there is always a cup to a pint of water that seems to pour out when I remove the end cap. Placing the bucket under the sewer outlet catches those little spills and leaves no unpleasant surprises for the next guy. I also use the bucket to coil my black water flush hose while traveling.
Once you get experienced in the art of sewer dumping, you can use the black tank flush hose to add 4-5 gallons of water to your black tank before you put it away.
One thing just occurred to me after reading this excellent article. Upon disconnecting the sewer hose from your rig, spray the rig’s sewer port with Lysol spray disinfectant. And then do the same with the sewer hose and elbow before storing everything back into your storage crate. I’ve never done this before, but I’m adding it to my routine.
You need to have the valve on your black tank looked at. Either there’s something caught in the slot that the valve door closes into, or your valve is just not closing all the way.
Second that! The bucket is most critical
Great article, thanks. The first thing I do after parking at a dump station is put on a pair of Wellies & the last thing I do is clean them off & stow them before stepping back inside my home.
I seat the station end of the dump hose first, then hold the open end of the hose under the valve cap as I take it off, just in case. If it gushes instead of runs gently, have your valve looked at.
do Grey water tanks dump in the dumping station seperate or through the blackwater tank? seems like it would make sense to have an “either or” dump system design.makes sense to me to use the Grey water to flush through the black water tank. then when you flush the grey water tank out it flushes through the blackwater tank on out to the dump station.
sorry I never rv’d before but, am reading up on it before I do purchase.
I’m interested in design by convenience and any smart design features.
The two lines from the tanks merge into one pipe that is where you connect the sewer hose Dump the black first and rinse the tank through the rinse port. Then dump the gray. Finally rinse the sewer drain hose again and put it away.
Doing that would introduce a possible path from the black tank back into the gray tank, which would be contrary to code.
Yes… this is exactly what I do. I have a third valve that lets me cross dump my gray water into the black tank. The order in this article is faulty, not even sure it was written by someone who RV much. You should always open the gray valve first for a couple seconds to make sure none of your connections are bad. Then shut gray, dump black, cross dump gray into the black tank, then dump black and rinse. Lastly is dump remaining gray to rinse out the hose.
I always flush the black tank after emptying so that when I get done, I can use the grey tank water to flush the sewer hose. If I don’t, then more black tank junk could be in the sewer hose without being able to flush it.
“A dedicated black tank flush-out hose: This hose is usually orange and is used only for flushing your black tank or grey tank after you dump.” Really? In the 3 decades I’ve spent RVing, I’ve never had an “orange” hose. What I used were old garden hoses that had black tape on the ends to note they were “waste” hoses.
Yes, there are orange water hoses dedicated to rinsing black/gray water. I, too, used garden hoses as black clean out hoses for years. Then I found the orange ones. They’ve been out for several years now. Makes it easy…Blue/White for fresh clean water….waste is orange. I would have preferred black, but the orange is fine.
I use a lightweight black “accordion” hose for flush, as nothing but clean water ever goes inside it anyway, it spends only a short while pressurized, and it collapses down to a very small bucket.
Try using a probiotic type of black tank treatment such as “Happy Camper”. We have been using it for the last several years. We almost never need to use the fresh water flush. There is seldom any clumps of paper or lumps seen in the clear elbow.
Lippert WasteMaster ….. “Mic Drop”
“Firmly attach your dedicated RV black tank flush-out hose to your RV’s black tank flush intake.” A lot of older Travel Trailers do not have a hookup for a black tank flush. In my case, I just add about a gallon or 2 of water to the toilet and run that through the hose to flush it out. Usually 2 to 3 times is good. You can use the fresh water from the RV tank or just run a hose into the bathroom and use the hose to fill the toilet.
We always drain just a little of our grey water first, in order to be sure that all our connections are secure and there are no leaks. Then we proceed as this article describes.
After the black tank is drained and the valve is closed, grey tank is drained and valve closed, I turn on the flushing hose water and let the black tank fill up at least 2/3, then open the black tank drain. This helps get stuff washed off the sides of the tank. When the water is running clear, then I shut off the water and close the valve.
This is such a good idea. If a little bit of grey water leaks out of somewhere, that would be nothing compared to having black water leak out.
I ALWAYS put on knee pads. It helps keeps my pants out of the gunk from any previous (careless) dumpers and is easier on the joints.
I agree with all of the process except opening the valve all at once. Too many horror stories about opening a valve completely instead of slowly. Everything gets old and sometimes loosens, then, comes the realization that slower might be better to begin letting out the black or gray water. I always start slow and then open fully.
If your RV does not have a black tank flush valve, you can insert your blades k tank flush hose directly into the toilet. Just flush the toilet and keep the foot flush depressed to hold open the flush valve and insert the hose while it is open. Once the hose is inserted release the pedal and turn on the water. Usually 2 to 3 minutes is adequate. If you have a clear 90 on your sewer hose,just watch it until the water runs clear.
Old 5th wheel has no black tank flush. Clear 45 deg drain elbow has hose fitting. After draining the black tank I use a short hose and $10 flow meter (prevents adding too much water) to add flush water to my black tank. Then drain it all again. Repeat as needed.
I disagree with opening the black valve again after the grey is dumped. Flush the black tank (if so equipped) after tank empties until clear water is flowing. If not equipped with flush hook up, do as the other people have said, run water down the toilet. Then close the black valve, open the grey.
Test security of connections with Grey water before opening ffblack valve , saves embarrassing odors, etc
Exactly! The Gray tank has soap and helps to wash and sanitize the dump hose. Always do the complete black tank wash before you dump the gray.
I would make one suggested change to the steps shown… On Step 10-11, you should leave the Black Water valve CLOSED as you are flushing the Black Water tank. Flush it by filling roughly 3/4 full and then turn of the flush filling and open the Black Valve fully to dump it again. The water should be clear after this second dump. If you leave the Black Water valve open while you are flushing, you will never clean out the tank or the debris because the water runs out as soon as it enters the Black Water tank.
I would open the gray water and release a little to make sure there are no leaks in the system at the joints or pin holes in the hose. Better to have a gray leak on the ground than a black one. Once every thing checks out open the black and follow the rest of the steps.
For RV’s with combined black and grey water gate valves;
To make sure you are completely emptying the black water tank of any effluent before doing the grey water tank, I fill the toilet as full as I can with clean water and doing it twice to flush any material build up before opening the grey water valve which will allow some of the grey water flow into the black water tank there by cleaning the gate valve tracks of any material. When both tanks are about empty, shut the black water gate valve first and then the grey water gate valve and let drain a few minutes to let any water to drain out before removing the hose. A quick flush with the wash hose will rinse the sewer hose before stowing it.
I think there are a couple misses and some adds that need to be addressed. First, most experienced RV’ers install a Valera manual valve to the end of the sewer pipe on the trailer. This stops any left over liquid from sitting at the end of the pipe and leak out when you remove the cover – a cheap insurance for about $20.
2nd, most of us drain the black tank and then flush the black tank, then drain the gray tank, which allows the gray tank liquid to flush the sewer hose. Then use water to do a final clean the sewer hose.
These are not requirements, but it make the process much simpler and less work.
It all sounds good until you are the 3rd rv in line waiting for everyone who’s using their black tank flush. Polite campers only do this in full hookup sites or at home. It doesn’t need to be flushed every time you dump. Just add 2 or three gallons (very full toilet bowls) after dumping.
that’s how we have been doing it for 37 years works well for us now as far as hose we to this day still use the little blue hose 1″1/4 and the macerator
After flushing the tank and the water runs clear I put at least 3 gal of water back in the Black and Grey tanks to control odors. Any residue left on the tank walls, will be washed by the sloshing of the water in the tank… and it helps to control bacteria growth…
Different strokes for different folks. The main thing is “Dump Station Etiquette”. Chances are there will be numerous campers at the dump station waiting to dump. This is the nature of the beast. Pulling up to dump is not the time to rearrange your camping gear in the pass-thru. Leave your phone in your vehicle. This is no time to be texting. Pat attention to the task at hand. When you pull up be ready to dump and flush. Have your gear ready. Lastly, if you make a mess clean it up! Don’t leave it for the next camper, and put your gloves in the trash can rather than throw them on the ground near the dump sump.
I could not believe how many things they got wrong or backwards.
I realize the author’s rig is a tiny trailer without many amenities. But most RVs today have black tank sprayers built into the tank. Sort of like the top sprayer in your dishwasher. The Rhinoflex hose has a milky color connector on the end that’s hard to see through. I like to use a clear connector on the RV end of the sewer hose. I also like to dump my Black water tank and then run the sprayer for 45 secs. to a min. then dump again. Then repeat until nothing but clear comes out. Then I dump the grey tanks. You should always disconnect the RV end of the hose first and raise it up to get rid of any water or solids out then rinse it. I never get anything on my hands or spill anything. I use a disinfectant wipe when I’m through. (cheaper than gloves)
Personally, I flush my black tank before emptying my gray tank. I want my hose flushed clean with soapy water. Also, double-check that you have removed the hose for flushing your black tank. I once got sidetracked and pulled away damaging the pump and ripping my Sani-flush valve from my van. A very bad lesson to learn.
Years ago, I read a tip re flushing RV tanks. It stated that FIRST, for about 30 ~ 60 seconds, flush GREY water. That way, you can check for leaks, connections and, the grey water can “lubricate” the sewer hose. Once you know you have no leaks, shut the grey valve and open the black tank valve. Once the black tank is empty, THEN finish up by emptying the grey tank. I’ve followed this procedure for almost a decade and, it works great. Should I ever have a leak, the mess will be grey water instead of black water.
Does the grey tank also use a hose to empty?
Etiquette: take as little time as possible at the station if others are waiting. Dump the black, then the gray, close up, and add a cushion into the tank from the fresh water tank after you pull away from the dump station and park safely. Chances are, the sloshing of the cushion in the black tank will suffice as a “flush” until you can do a regular one without delaying others.
Great article, but one exception. We just recently purchased the Camco Rhinoflex Sewer Hose kit and, unfortunately, there either is a design flaw or mine was just an issue. We have to manually hold the hose to the connection at the outflow outlet on the RV. The connector that came with ours does not have that little indention in the slide where it “locks” into place. The force of fluids coming out, sometimes, causes the hose to vibrate loose — not a pretty sight.
Make sure the valves are shut before you take off the cap!!
My 3 year old granddaughter had messed with the black valve, unknown to me. I took off the cap to put on the hose and… I didn’t get any on me, but my gloves got soaked, and I had to pick up some chunks with my dog bags.
Luckily no one was around, it was Tuesday afternoon.
At least one of the hooks on the Rhinoflex should have a “detente” notch. You may be able to tighten the fitting by adding a second internal gasket, though it might be difficult to keep it from slipping out of place.
Nice article is t common sense a wonderful thing.
Any suggestions on how
to lubricate the flush valve slide, with out taking it apart.
There are commercial tank additives that claim to lube your valves with coconut oil and the like. You add them to a clean tank before driving to your next stopover. Then you hook up to sewer and pop the valve briefly a few times to let the clean lube get everywhere. I’ve used them; they’re not expensive, and certainly never hurt anything.
Wow, I can’t believe the poor support strap on the left side of the “Y”. I definitely would not want to own that unit.
Two tips: Replace the drain cap with one that comes with a small garden hose cap, if space allows, replace this tiny cap with a screw on plastic garden hose valve. Then before you remove this big 3″ cap cover, open the small drain valve and let any drops drip into your Big Drain hose (instead of on the ground as sometimes there are small leaks and you dont want an unexpected surprise draining on the ground or your hands.) 2. clean the 3″ drain cap of dirt and debris before putting it back on otherwise, dirt grit and tiny rocks will make it difficult to remove next time using just your hands. You will rarely have a nice clean concrete area to work with like their photo above. I use strap on cheep knee pads many times find myself kneeling in sand and mud and gravel and who know what else!
x2 on the flushing of black tank when you have full hookups. Not a dump station task when others are waiting in line
I have not read all of the comments, so there may be some repetition here … but experience tells me that after donning the requisite gloves:
1) Before opening anything other than the door to the tank outlets push both of the blades in firmly. Like I said, experience tells me.
2) Get a sewer cap that has a small cap inside it and, after step one has been completed, remove the small cap to ensure that there is not a torrent racing out at you. A bucket is handy, though cleaning up with the nonpotable water hose works.
3) Remove the sewer cap and give it a rinse. Prior to connecting the sewer hose check that the gasket on the connecting end is in place. It’s amazing what experience teaches.
4) When you are fairly sure that the hose is on securely, let some of the grey water out – yes the GREY water! If there is going to be trouble you want it grey, not black. A tiny bit will tell you whether you are good to go. If so, close that tank and open the black.
The rest is easy and fairly painless – just follow the steps.
I hope I have saved someone a couple of my lessons.
I now use a Valterra T28 valve between my sewer dump and cover simple twist on and eliminates surprises when removing the cap to put the hose on.